Melissa has posted a comment asking where to find a Cylinder Filling Machine. I think it's a great question, so I'm bumping it up here as a new post:
-------------
Melissa said...
Someone has gifted me a weavers delight loom, and I have found your blog a great help. I have never worked a loom before so this is all new to me!
I do have a question for you. My loom did not come with the cylinder loading machine, so do you suppose I can load them by hand? And, have you seen any of the loaders for sale?
-------------
Here is the reply I posted:
Hi Melissa,
What a fantastic gift! Congratulations on your new WD. I'm glad the blog is of some use.
I can think of 2 places to look for the cylinder loading machine:
One is Leslie at Riverside Loomworks, where you can buy parts:
rivloom@sbcglobal.net
The other is to join the RugTalk group on Yahoo Groups and ask there if anyone has a spare:
http://groups.yahoo.com/group/Rugtalk/
RugTalk is a great group of experienced rugweavers helping each other (and newbies like me).
Laura
-------------
I forgot to answer part of her question, so here's the rest: I haven't tried filling the cylinders by hand, but I suppose it can be done. Find a stick to beat the rags in with, and then try stuffing them in and beating them down. The goal is to beat them down firmly into flat layers as you go. If you can find a way to feed them from above, as the filling machine does, that will go faster. If you are handy you could probably build something yourself for filling cylinders.
The machine is fast though, so it'd be worth finding one if building one doesn't sound appealing.
Does anyone have other ideas or suggestions for her? If so, please add a comment.
Tuesday, December 28, 2010
Wednesday, September 29, 2010
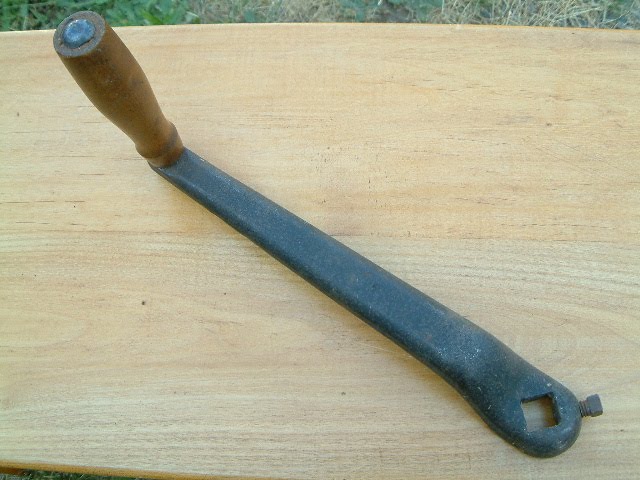
The Wonderful Wrench
One of the best things about this old loom is the suprisingly beautiful multi-wrench that came with it. I imagine many of these got separated from their looms, but not this one:
 It is a super handy little tool, and cuts way down on the tools required in order to tinker & adjust things.
I haven't had time to work at the loom at all since my last post, and I expect to be booked well into October with other projects that were on hold while I got the loom going. One good thing about looms is that they will wait. And wait. And still be wonderful when we have time to get back to them.

I haven't had time to work at the loom at all since my last post, and I expect to be booked well into October with other projects that were on hold while I got the loom going. One good thing about looms is that they will wait. And wait. And still be wonderful when we have time to get back to them.
Friday, September 17, 2010
First Rug on Loom
Here are the results of the first rug experiment:

It'll stay on the loom, since the warp is tensioned & working well. I will probably weave the entire warp and then remove the woven rugs & see how they look.
My 40" fabric tube made a rug that measures about 50" on the loom. With the 39" warp width (about 37" woven), that is a bit short. Especially since it will shrink once it isn't under tension on the loom, and probably further with washing. I would prefer something closer to 60" or even 64". But the length in this case was based on some cloth I had on hand.
You can see the thread repairs hanging down, these will have to be properly finished when the rug comes off the loom.
The structure is plain weave, so the log-cabin style threading pattern shows a little bit. But with these bright colors, it doesn't show much!
I have selected the fabrics for the next experiment, but not begun the process yet.
Sunday, September 12, 2010
More on Old Yarn
Lou pointed out to me that he is still using Maysville carpet warp from the 80's with no problems. He's right, it's a great product and I've never had trouble with it. It's fair to say the problems Ive had with broken threads on this warp could be user error or a storage problem or something like that. I would never hesitate to buy Maysville warp. It's good stuff.
Thanks, Lou for pointing this out, I would not want to be misunderstood on this.
I have had some cotton yarns that became weak with (great) age, but those were fine yarns & not made by Maysville.
I do wonder if there's a limit on how old a yarn must be before it weakens, but factors like brand, storage, and color (dyes used) would affect the answer.
If anyone has more info on this, please do share it.
Old Yarn
I have had a lot of broken threads on this warp so far. Far more than I would expect. I think it might be the age of the yarn. I think this yarn might be quite old.
Here is a box of yarn that came with the loom:

And here is what the yarn inside looks like:

I haven't used any from this box, but I have used several partially-used spools that came with the loom. Which means the yarn I put on the loom is at least 40 years old. I'm not sure I want to use the stuff in the box, if this is any indication of what to expect. I often use old yarn, I have a lot from the 80's and even a few cones from the 70's, but this yarn is 60's or earlier. Maybe that's the limit for cotton? My older yarns are all wool or linen, and seem to have held up well.
Maysville carpet warp is still made today. The Maysville Guild doesn't exist anymore, as far as I know. They had a newsletter and encouraged members to send in pictures of themselves and their work. Membership was free. I'm not sure where to find the old newsletters, perhaps some are online somewhere.
Tuesday, September 7, 2010
Selvedge Rollers
+rollers.JPG)
Called "Tension Rollers" in the manual, these fit onto the long rod that goes across just under the front beam. They look like this in use:

The device holds the roller itself - like a super-prickly little pine cone - against the underside of the cloth. The teeth on each roller are aimed toward the edge of the cloth, so that it always wants to pull the cloth out to its full width. This prevents draw-in, which can cause edge threads to break from high friction as they pass through the reed in a non-straight line.
These are an alternative to using a temple. You can see a temple in use in this picture, across the cloth that's just been woven:

It's a bar with sharp teeth at each end, you set it to the width you need and it keeps the cloth that wide. But it must be moved up the cloth regularly as you weave.
This is where selvedge rollers have a distinct advantage. They do not need to be moved, they just stay in place as the cloth moves past. Very convenient. They are covered in very sharp little needles, though. I scraped my finger pretty good on one when reaching into a box where it was located, early on in the loom set-up. I have had zero incidents so far while weaving with them, though. And they do seem to work.
Monday, September 6, 2010
First Attempt at a Rag Rug
After trying some experiments, I settled on cutting up some 60" wide polyester fleece fabric bound for charity and seeing how it weaves up.
I used 2 colors, red and violet. I had about 40" of each. I trimmed off the selvedges from both, sewed the 2 fabrics up into a tube, and cut the tube into one long strip, using my Fraser rag cutter. I set the rag cutter blade 1/2" from the guide, but the actual strips came out closer to 5/8" or even 3/4".
At first cutting the rags was difficult, because I was trying to manage the tube. It had to be rolled along in tandem with the cutting, which was a PITA.
Then I got an idea: I arranged the tube like a big twirly skirt, with one end bunched up in the middle, and one end spread out flat all around the perimiter, in a circle. That way I could crank the cutter and keep the whirlpool of fabric turning pretty easily:

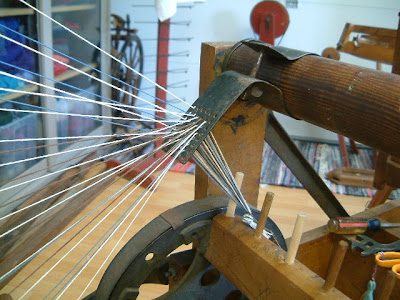
Then it was time to get out the cylinder filling machine, which I have heard others call the Pink Pony. Mine is red, and the detailing on my loom is red, but it has faded to pink in one area where it must have been in the sun for many years. So I think the Pink Ponies may all have been red once. Here's mine, along with the box of 12 cylinders and the baton that's used to pack the rags into the cans as you load them:

The strip of rag goes up through an eye bolt ahead of the front pair of wheels, between the 2 wheels, and down through the funnel into a cylinder. You sit on the tiny seat and crank the big wheel, and the rags go remarkably quickly into the cylinder. You have to pack constantly with the baton so the rags will feed well in the shuttle.
Here is a top view while filling the cylinders:

My 40" tube made enough rags to fill 6 1/2 cylinders.
Here is the shuttle with a cylinder (and a different weft rag):

Here is a tin cylinder, showing the seam and the closed bottom:

I wove the first couple of cylinders, and I get about 7" of weaving out of each. The warp is 39" wide. More pics soon.
I used 2 colors, red and violet. I had about 40" of each. I trimmed off the selvedges from both, sewed the 2 fabrics up into a tube, and cut the tube into one long strip, using my Fraser rag cutter. I set the rag cutter blade 1/2" from the guide, but the actual strips came out closer to 5/8" or even 3/4".
At first cutting the rags was difficult, because I was trying to manage the tube. It had to be rolled along in tandem with the cutting, which was a PITA.
Then I got an idea: I arranged the tube like a big twirly skirt, with one end bunched up in the middle, and one end spread out flat all around the perimiter, in a circle. That way I could crank the cutter and keep the whirlpool of fabric turning pretty easily:

Then it was time to get out the cylinder filling machine, which I have heard others call the Pink Pony. Mine is red, and the detailing on my loom is red, but it has faded to pink in one area where it must have been in the sun for many years. So I think the Pink Ponies may all have been red once. Here's mine, along with the box of 12 cylinders and the baton that's used to pack the rags into the cans as you load them:

The strip of rag goes up through an eye bolt ahead of the front pair of wheels, between the 2 wheels, and down through the funnel into a cylinder. You sit on the tiny seat and crank the big wheel, and the rags go remarkably quickly into the cylinder. You have to pack constantly with the baton so the rags will feed well in the shuttle.
Here is a top view while filling the cylinders:

My 40" tube made enough rags to fill 6 1/2 cylinders.
Here is the shuttle with a cylinder (and a different weft rag):

Here is a tin cylinder, showing the seam and the closed bottom:

I wove the first couple of cylinders, and I get about 7" of weaving out of each. The warp is 39" wide. More pics soon.
Friday, September 3, 2010
Poetry in Motion, and Sampling
At last, the video I've been promising! Here is the Weaver's Delight in motion (972 K):
In the end I'm glad I bought it, it's been a blast and it really seems like a versatile loom. After I try some rugs I will then try some fine wool cloth. That will be much later, I put 10 yards of rug warp on!

I wove quite a bit in the twill that the loom came set up to do. Mostly I used brown & blue carpet warp, but also a few rag strips. I know, this is way too dark to really see, more of an "art" shot. Then I changed to plain weave cams.
Here is what the change from the 2/2 twill cams to plain weave cams looks like:

You can see the "bricks" style pattern in the top & middle of the piece, and a more vague vertical stripe pattern, resulting from using the twill cams, below that. That top purple bit is some fuzzy fleece. The blue below it is 8/4 carpet warp, it's narrower than the rags so it results in more of a stripe pattern. The pink/cream stuff below that is some scrap fabric. I sewed 2 panels together to try to get a pick-and-pick alternating weft colors effect. The 2 fabrics are far too close in value for any contrast to show up.
Ain't she a beaut!
I wonder if I'd seen a video like this before I bought the loom, would I have been more intrigued, or more intimidated?
In the end I'm glad I bought it, it's been a blast and it really seems like a versatile loom. After I try some rugs I will then try some fine wool cloth. That will be much later, I put 10 yards of rug warp on!
And here is a little bit of sampling I've been doing:

I wove quite a bit in the twill that the loom came set up to do. Mostly I used brown & blue carpet warp, but also a few rag strips. I know, this is way too dark to really see, more of an "art" shot. Then I changed to plain weave cams.
Here is what the change from the 2/2 twill cams to plain weave cams looks like:

You can see the "bricks" style pattern in the top & middle of the piece, and a more vague vertical stripe pattern, resulting from using the twill cams, below that. That top purple bit is some fuzzy fleece. The blue below it is 8/4 carpet warp, it's narrower than the rags so it results in more of a stripe pattern. The pink/cream stuff below that is some scrap fabric. I sewed 2 panels together to try to get a pick-and-pick alternating weft colors effect. The 2 fabrics are far too close in value for any contrast to show up.
Thursday, August 26, 2010
Great Pics Sent by Another WD Owner
A reader has sent me some very helpful pictures of modifications he has made to his two Weaver's Delight looms. I thought others would get a kick out of seeing his ideas.
First is his brilliant invention for trapping the lobe of the star wheel in order to get it into position for the next pick. His device uses a rolling-pin assembly that slides in a diagonal slot to catch the lobe of the star wheel and pull the whole mechanism forward as far as it will go, getting the rack & star wheel into optimal position for the next pick. This prevents having to push the beater back so hard, which could prevent damage to the shafts in the long run. These 2 pics show how he built the same sort of thing for 2 different looms. On the top one you'll notice that the loom was missing the "A" bracket so he built a substitute for that as well:


Next is his simple and clever solution for using the spool racks. I mentioned that the spools would catch and bind. He uses a washer to keep them away from the central part of the rack that can catch them:

And last (so far) is his solution for measuring warp as it goes onto the loom. He uses what I think is a fishing line measuring device on his tension box:


Bravo! And thanks to this inventor for sharing your ideas with us!
Laura
Sunday, August 22, 2010
Warping, continued
As you weavers know, warping is a long process. Here is some more of it.
Yesterday I removed the front beam, cloth beam, and the rod just below the front beam, which will hold the selvedge rollers, so I could set a loom bench inside the front of the loom. I propped the shafts up on blocks so they were all at the same height, and I removed the top of the beater, and also the reed, for easy access to the heddles:

Here is threading the heddles:

Then I had a major distraction, in the form of this little guy:

This is a baby squirrel which my cat brought home, unharmed as far as I could tell. Darn cat! I bell my cats, but once in awhile they get into mischief anyway. This fellow's eyes aren't even open yet, so he's probably less than 4 weeks old. We didn't know where his nest or mom were, and it was getting dark, so we found a wildlife rehab place to take him to. This is best when cats have handled an animal, as they have a lot of bacteria in their mouths and even an invisible injury can kill wildlife if they don't get proper care. He was quite calm and snuggled up in my hands to keep warm except once when he heard a dog barking. That made him squirm. When I opened up his towel to check on him he would try to crawl away from the light. His legs & feet seemed to work fine, no broken bones, and no scratches.

I took these pics just before we left home with him after 8 pm, and he was very sleepy. We were able to find a dropoff point for the rehab center that's open 24 hours a day, so we were able to get him to an expert within a few hours of finding him. He slept the whole way there.
I know the shop towel looks dirty, but it's fresh from the wash and in good shape. It's important not to use cloth that's raveling when you wrap up wildlife, so they can't get tangled up in the strings, which can kill them.
I finally got back to warping today:
In order to sley the reed, I laid some lease sticks from another loom through the loom from front to back, so I had something to lay the reed on, then sleyed with the reed lying down:

This loom was super fast and pleasant to warp, since I could remove so many parts & get right in where I could sit comfortably. If you have never sleyed a reed that was laid flat, try it. It's so much faster!
Next came lashing on:

Then winding a pirn on the bobbin winder that came with the loom:
 That didn't go too well, the leather band has stretched too much for the winder to work as intented. It hasn't stretched enough that I could simply add a twist between the drive wheel and the wheel of the spindle, so I came up with a temporary solution: run the band under the bar of the C clamp that holds the winder to the table. I don't have the original clamp (that's the only piece of the loom that I think I didn't get).
Here is the shuttle that big pirn goes into:

And at long last, I can finally begin testing:

Hooray! It works! Now I am working on learning to adjust the tension so that the automatic cloth advance takes up just the right amount on each pick.
Yesterday I removed the front beam, cloth beam, and the rod just below the front beam, which will hold the selvedge rollers, so I could set a loom bench inside the front of the loom. I propped the shafts up on blocks so they were all at the same height, and I removed the top of the beater, and also the reed, for easy access to the heddles:

Here is threading the heddles:

Then I had a major distraction, in the form of this little guy:

This is a baby squirrel which my cat brought home, unharmed as far as I could tell. Darn cat! I bell my cats, but once in awhile they get into mischief anyway. This fellow's eyes aren't even open yet, so he's probably less than 4 weeks old. We didn't know where his nest or mom were, and it was getting dark, so we found a wildlife rehab place to take him to. This is best when cats have handled an animal, as they have a lot of bacteria in their mouths and even an invisible injury can kill wildlife if they don't get proper care. He was quite calm and snuggled up in my hands to keep warm except once when he heard a dog barking. That made him squirm. When I opened up his towel to check on him he would try to crawl away from the light. His legs & feet seemed to work fine, no broken bones, and no scratches.

I took these pics just before we left home with him after 8 pm, and he was very sleepy. We were able to find a dropoff point for the rehab center that's open 24 hours a day, so we were able to get him to an expert within a few hours of finding him. He slept the whole way there.
I know the shop towel looks dirty, but it's fresh from the wash and in good shape. It's important not to use cloth that's raveling when you wrap up wildlife, so they can't get tangled up in the strings, which can kill them.
I finally got back to warping today:
In order to sley the reed, I laid some lease sticks from another loom through the loom from front to back, so I had something to lay the reed on, then sleyed with the reed lying down:

This loom was super fast and pleasant to warp, since I could remove so many parts & get right in where I could sit comfortably. If you have never sleyed a reed that was laid flat, try it. It's so much faster!
Next came lashing on:

Then winding a pirn on the bobbin winder that came with the loom:

Here is the shuttle that big pirn goes into:

And at long last, I can finally begin testing:

Hooray! It works! Now I am working on learning to adjust the tension so that the automatic cloth advance takes up just the right amount on each pick.
Friday, August 20, 2010
Warping
I've cleaned and oiled everything (I think), cleaned the reed (scrubbed it with a wire brush), and replaced several broken pegs on the sectional beam. I can't think of anything else I really must do before warping, so on to warping I go. I have no doubt that partway into the job I will think of something more that needs doing.
But it's good to get started. I used one of the spool racks that came with the loom:

This turned out to be a real hassle. The spools would catch, and the whole rack would start to tip over. I ended up holding the rack upright with one hand while turning the beam with the other. Next time I'll use my creel that came with my Gallinger loom.
I also used the thread guide that came with the loom:

Here it is installed on the back beam of the loom:

This also turned out to be a hassle. The thread guide is held in place with a screw & wing nut, which were hard to tighten and loosen. It needs to be loosened & moved to each new section of the beam, and then tightened again. Grr!
I'm not sure what to use instead. On the Gallinger I just use a hair comb. I put the threads between the teeth, and set the comb into the groove that goes down the length of the back beam. The beam on this loom is round, and has no groove, so that won't work here. I hear others use a tension box. I have one, but with a creel it isn't really necessary.
Well, I guess I'll cross that bridge when I get to it. First I have to thread THIS warp & actually weave it off!
I tied the warp threads into a knot and tucked it into the overall bib closure thing at the end of each warp beam strap:

As you can see, those straps were just the wrong length: They caused the knot to be positioned right on a cross brace. I re-routed the straps through the middle of the beam (which is open), so the ends landed in between the cross braces, giving the knot someplace to go to get out of the way. I didn't get a pic of that, though.
I wound on 10 yards in brown, blue, and white Maysville carpet warp. This was based on yarn that came with the loom, supplemented with some I had on hand. I'll thread it in something roughly akin to log cabin.
A "Registering Device" came with the loom, which is designed to count turns of the warp beam:

Unfortunately, it's damaged, so I used the Simplex device to count turns of the warp beam. The beam ends aren't drilled for the Simplex, so I just taped it to one end. I forgot to get a pic of that. It looked ridiculous, a big wad of blue painter's tape holding it in place, but it did work.
I didn't know if I could trust the Simplex completely, so I also counted myself. Even so, I think I may have wound one section too short and a few too long. Luckily the possibly-short one is on the end, so I can just make the last rug or sample a little narrower.
I attached the warp beam crank, but never ended up using it (since I had to keep that spool rack from falling over). Here's what it looks like:
Monday, August 16, 2010
Part A, Rack B, and the Star Wheel
I've had some requests to show closely what shape these 2 parts are in, as they may be a factor in my frustration with the pitmen hitting the floor and having to push the beater against the shafts in order to move to the next pick. Here is the rack in the down position, when the beater is back:
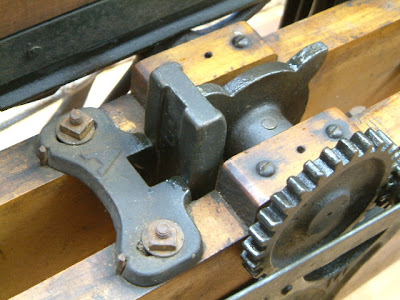


And here is the rack in the up position, when the beater is forward:

The rack B and the part A that presses it against the star wheel just right of it, and the star wheel itself, all look to me like they're in great shape. I do think the top star-wheel-side flare of the rack could be a little thicker, and that would allow the mechanism to move to the next pick more easily. But it really appears to have been cast the way it is, not worn down.

I tried taping a bit of cardstock to the rack there (above the opening), and it might have helped, but it's hard to tell. Something thicker would give a better indication, but I'm drawing a blank on what to try that will hold up to the strain. Maybe if I could find a piece of copper sheet from my printmaking or jewelry class days. Then I'd have to figure out how to hold it in place, too.
Or I could just beat the crap out of shaft 1 when I weave.
Sunday, August 15, 2010
Resources for Owners of Weaver's Delights (and other looms)
There are a few hugely important resources available to owners of these looms. The first is Riverside Loomworks, where you can find both advice and parts. Here is a description owner Leslie Johnson provided for me to post here:
Riverside Loomworks – Newcomb loom repair parts
Riverside Loomworks is a home-based business in Eaton Rapids, Mich., that provides repair and replacement parts for the Weaver’s Delight, Improved No. 3 and Studio (or Studio Art) looms, all made by the Newcomb Loom Co., Davenport, Iowa. Leslie Johnson is the fifth owner of the parts business, which came into being after the Newcomb Co. went out of business in the early 1980s. The two-person operation (owner and weaver Leslie and blacksmith/welder/fabricator Paul) draws on the help of a foundry in Indiana (cast iron parts), an Amish harnessmaker (picker stick straps and bootheels) in Indiana and a woodworker (Studio lamms, tension boxes, etc.) in Michigan, and years of experience weaving on and troubleshooting Weaver’s Delight and Studio looms. Reconditioned looms (Newcomb and others) are usually available, along with new shuttle cans for the WD and wooden pirns for use in the WD flying shuttles, and used accessories such as spool racks and stuffing machines. Help and occasionally parts may be available for other brands of looms, also. Write, call or e-mail to: Riverside Loomworks, P.O. Box 522, Eaton Rapids, MI 48827; (517) 663-0357; rivloom@sbcglobal.net
Leslie has been instrumental in this project of mine, she has helped me figure out so many things about how the parts of this loom go together, and she has some parts I know I'll be needing, such as pickers (bootheels). I never dreamed I would be able to find parts for this loom still being made!
They don't have a web site, but if you write to Leslie she can email you a parts price list & answer questions.
Janet Meany and the Weaver's Friend Loom Manual Library
Janet is one of the authors of The Rag Rug Handbook, which is a great information source on rag weaving as well as the antique looms still used. It was this book which piqued my interest in the Weaver's Delight loom years ago, and I've been waiting to see one in person ever since (until now).
Janet publishes a rug weaving newsletter called The Weaver's Friend:
http://www.weaversfriend.com/
She also is keeper of The Loom Manual Library, where you can buy manuals for many antique looms, including the Weaver's Delight. She also provides other historic information related to looms & loom manufacturers. Her prices are fair, they appear to me to cover printing & postage, mainly:
http://www.weaversfriend.com/page1/page1.html
Historic Looms of America (formerly the Newcomb Looms Historical Society)
They offer several services:
Loom Registration Service
This service registers your loom with HLA and enables loom owners to access the early history of their loom from the original Newcomb business records: the loom’s date of production and original selling price, original owner, and original destination when shipped from the Newcomb factory. Those who register their looms will receive a certificate of ownership.
Loom Referral Service
This service is invaluable to those restoring Newcomb Looms, particularly as the Newcomb manual does not offer adequate photos or schematics on the looms. For the cost of this service, HLA computer records are searched to put you in touch with three other looms owners in your region.
They also offer manuals, historic information on looms & manufacturers, and back issues of The Journal of the Newcomb Looms Historical Society, which contain historical information.
Contact Theresa Trebon for pricing and further info:
Theresa L. Trebon
Continuum History and Research
Historic Looms of America
trebon@comcast.net
Saturday, August 14, 2010
Cloth Beam Brake
Here are some pictures of how the cloth beam brake & advance system goes together, for Cindy on the Rugtalk list, and anyone else who's interested:
From the inside of the loom, showing the upper pawl, which moves the cloth advance, and the lower pawl, which holds tension on the beam. You can also see lever "L", which goes toward the back of the loom (upper left in this picture) and rides on a wheel attached to the sword of the lay (upright post of the beater):

Here is the view from the outside of the loom, showing a good view of lever "L" passing over the wheel on the sword of the lay, plus the bracket/spring assembly that connects to an eyebolt on the outside of the right-hand lower frame of the loom:

On older Weaver's Delights, they had a heavy weight in place of the spring.
Pitmen and Brakes
Pitmen
Leslie Johnson of Riverside Loomworks tells me those "Linkages" are called Pitmen. They are in the right place, attached to the Walking Beam (another new name!), and they are supposed to be tightened down hard. But when I tighten mine the loom becomes so stiff I can hardly use it, so I loosened them slightly for now. She and Annie both tell me that my bracket "A" and rack "B" cast iron parts may be worn and need checking. I will post a pic of those once I have some light. They don't look worn to me at all. But I have begun to suspect the rack may be worn, or may be a poor casting, because if I pad it up with a bit of cardboard things seem to work better.
However, I'm still not sure anything at all is wrong with the loom itself-there is a lot of room for user error at this point.
Right now the loom is working very well, as long as I bang the beater back pretty hard, which is what it takes to get the shuttle to fly across. Other loom owners tell me this is pretty typical of these looms. Annie says this can be controlled somewhat with more adjustment. I will have to get better pics of those cast iron parts to see what everyone says.
When you throw the beater back hard, the walking beam comes down on the trigger stick (installed correctly now) so that it will push the stirrup down quickly to throw the shuttle. I just think there isn't a lot of space in the design, so shaft 1 and the beater want to be in the same place sometimes. We'll see if this causes problems down the road. Leslie tells me later versions of the loom used metal for the sides of the shaft frames, and perhaps this is why.
Brakes
Here for your enjoyment are a couple of pics of the front & back brakes. First an overall view of the cloth beam brake system. The cloth beam has a ratchet wheel brake with a spring-controlled pawl, and a lever which rides a little wheel attached to the sword of the lay (upright post of the beater) as it moves, and automatically advances the cloth with another pawl which can be disengaged when necessary. The pic also shows the crank wheel that controls the warp beam brake tension:

And here is the warp beam brake, from behind & below. You can see the long rod of the tension adjustment crank, its threaded end goes through holes in each of 2 iron pieces attached to either end of a steel strap that goes around the brake wheel, and then into a threaded hole in an iron block attached to the wood of the upright. A nut goes on the end of the rod where it leaves the block, to keep you from accidentally unthreading the whole thing when you're trying to adjust the tension. The long rod has a spring affixed to it near the end, so that when its in position the spring presses against the first iron piece it goes through, pinching that against its mate at the other end of the strap. This increases the tension in fine increments:

Wednesday, August 11, 2010
Linkages (?)
I'm not sure what to call these things, but I think they may need adjusting:


The problem I'm having is that when I push the beater back, I have to press it up against Shaft 1, and press Shaft 1 back a little bit (that can't be good, right?) in order to get the star wheel to engage for the next pick. Meanwhile, the bottom of the linkage hits the floor.
I installed the linkages sticking straight down because that is where the black mark on the wood showed they have been installed in the past. But maybe I can adjust these somehow?
I tried loosening the lag screws that hold them in place (they screw into the middle of the endgrain of that cross bar), and it seems like the beater swings more easily, but I still have to move it as far back to go to the next pick. But it doesn't seem like a good idea to run the loom with those lag screws loose. Do any Weaver's Delight owners out there have opinions or experiences that might help me?
Thanks.
Laura

Here is what it looks like installed, it goes at the bottom of the wood crossbar underneath the star wheel/rack aseembly:

The problem I'm having is that when I push the beater back, I have to press it up against Shaft 1, and press Shaft 1 back a little bit (that can't be good, right?) in order to get the star wheel to engage for the next pick. Meanwhile, the bottom of the linkage hits the floor.
I installed the linkages sticking straight down because that is where the black mark on the wood showed they have been installed in the past. But maybe I can adjust these somehow?
I tried loosening the lag screws that hold them in place (they screw into the middle of the endgrain of that cross bar), and it seems like the beater swings more easily, but I still have to move it as far back to go to the next pick. But it doesn't seem like a good idea to run the loom with those lag screws loose. Do any Weaver's Delight owners out there have opinions or experiences that might help me?
Thanks.
Laura
Sunday, August 8, 2010
Cleaning Heddles
I got up the courage to try cleaning the heddles in a vinegar soak. I was nervous because I know vinegar can accellerate rust if any is left on. But it's an acid, which means it can clean rust off as well. And it really works!
I soaked the first batch of heddles for a couple hours, then washed repeatedly with liquid castile soap (which is what I have next to the laundry room sink), until they seemed clean. The rinse water looked awful. The vinegar is rust-colored. The heddles are a lot cleaner. I am doing them one shaft's worth at a time. I have 2 done and a third soaking now.
Here is a pic of a rusty batch (top) and a batch just finished (bottom). It's hard to see the difference in this pic, but they are pretty different. There's still some rust on the finished batch, but a lot less, and it's not enough to rub off onto the warp yarns:

Once they are clean & dry, I have been spraying a small amount of the Tri-Flow on them, working it in (while wearing rubber gloves), and then rubbing them down with paper towels to remove all I can. That should leave a thin film that will prevent rust and allow them to move freely on the rails.
Thanks to Annie for suggesting the vinegar soak!
Saturday, August 7, 2010
Cleaning and Lubrication (and a bit on cams)
The manual (remember this is really old) suggests cleaning wood & metal parts with kerosene. I thought that sounded smelly and harsh, plus it's not something I have on hand or want to store, really. The manual suggests oiling everything with machine oil. By everything I mean EVERYTHING. Metal parts that rub on metal. Metal parts that rub on wood. Wood parts that rub on wood! This is a less-than-ideal lubrication method. Oil will turn the wood dark & can wick out into the woven cloth, plus it can turn sticky, so I really wanted to find something more suitable.
I started by cleaning the wood with Murphy's Oil Soap. I use this on all my looms, as it's very gentle and feeds the wood a little bit. It didn't damage the paint details, so I'm happy. And I kept it far from the decals, which are just paper, and coming loose in places. (If anyone has thoughts on protecting & re-gluing 80+ year old paper decals, I'd love to hear them.) The Murphy's didn't get the loom really *clean* yet, so I will have to clean it at least once more. My first bucket of water was black, so it's definitely working!
When I use Murphy's, I use a wrung-out sponge to apply it & rub gently, and then follow that up right away with a clean rag in the other hand. Leaving the wood wet for long can do bad things to the finish on looms, in my experience. The finish is usually old & fragile on these things, no need to stress it any more than necessary.
The previous owner(s) of this loom knew a lot about antiques, and it shows in the care they took with it. There was no tape (I have dealt with duct tape, masking tape, etc. and it's always nasty & impossible to remove without removing the finish as well), no more rust than I'd expect on a loom this old, and very little water damage. In my experience most old looms have some, perhaps because the finish is so thin.
I did some research on what products to use to clean & lubricate the metal parts, and ended up more confused than when I started. The range of opinions on what to use on looms is very broad. Everyone seems to agree that WD-40 is bad, since it leaves a residue film that hardens in time. I have avoided it for years for this reason.
Instead, I have used sewing machine oil on looms as well as sewing machines and knitting machines, because it is clean and has no additives to cause problems in the future with oxidation, and no detergents that will attract dirt or water. But in my research I learned that sewing machine oil isn't really adequate for parts like gears that have load-bearing metal-to-metal scraping or grinding action. In that situation you need a product that contains a good oil but you it also must contain a good boundary agent as well.
What is a boundary agent? I didn't know until I read this amazing article I found on lubricating guns, which provided a lot of good information on how lubricants work, but left me wondering what to do for load-bearing grinding or scraping parts, since guns don't really have loads to bear. But even knowing that's a problem for this situation is way more information than I had before reading this:
http://www.grantcunningham.com/lubricants101.html
Other weavers & Weaver's Delight owners on the Rugtalk yahoo group
http://groups.yahoo.com/group/Rugtalk/
made lots of good suggestions too. STP, machine oil, lightweight motor oil, white lithium grease, even vaseline. All of which have their merits. And none of which I had on hand.
In the end I decided to clean the metal parts with "3-in-One" oil, since I had some on hand. It's not the best product (for either guns or looms), and not what I would buy today, but it's not a bad product (from what I gather) and I decided it'd be adequate for cleaning.
After I applied it & worked the mechanism to work it in a bit, I removed all I could, along with gobs of black gunk. That black stuff is ground-up metal, you want to get it out of there, as it will cause damage to moving parts.
For a lubricant, I used Tri-Flow, which I bought years ago for mainaining bicycles. It's a good quality lubricant which includes teflon as a boundary agent. I don't know if it's ideal, but it's a good product & again I had it on hand, so I decided it would be a shame to waste it.
Now the gears move ultra-smoothly. It's very exciting!
Here is the gear mechanism at the heart of the loom. This is the back side, showing the gears & the slide that moves the "fork" (that loop of iron at the bottom):

And here is the front side, showing the cams which lift the shafts:

There is one cam per shaft, so 4 cams total, stacked one on top of the other on a rod and held with a nut (you can see the nut at the front). These 4 cams each cover about 1/4 of the circle, and are set up for doing 2/2 twill, which the manual calls "Kersey twill". Here are more cams that came with the loom:

Here is a rear view of the mechanism installed in the loom. The fork drags a wooden piece called the trigger stick side to side:

And here is a front view, showing the cams and the "stirrup" (that anchor-shaped thing at the bottom). The end of the trigger stick rests on the stirrup, and causes it to flip left and right with each pick, which causes the picker sticks to move, throwing the shuttle:

You can see that the end of the trigger stick is black on TOP. We installed it according to the manual's instructions, but the wear marks & iron marks (that black staining) on the wood suggest it has always been used upside down. I will flip it over soon & see if it moves better that way. Maybe the previous owners knew something I don't? Like maybe the manual was wrong on this point? In any case, the black surface is smoothed and curved so nicely (perhaps from wear) that I think the loom may work better once it's flipped.
Note: These photos are all before cleaning & oiling. It looks better to me now, but probably wouldn't look much different in a photo.
For lubricating wood-to-metal rub points, the ideal is paraffin or candle wax. For these points I use a bit of candle & rub it on the right spots. There are a few points that I'll be able to reach with that, but some others are not reachable with a candle, so for those I ended up letting the Tri-Flow get in there when I was oiling other parts nearby.
For lubricating wood-to-wood rub points, many recommend Johnson's Paste Wax or other floor-wax type products. I think I remember buying some Johnson's but can't find my can of it since we moved 4 years ago. I thought I knew where everything went in the move but I'm gradually discovering that there must have been one box that got lost, a box which contained a really odd collection of stuff I would normally not have thought to pack together. (grin)
Once the wood is cleaned & waxed adequately, another recommendation I've heard for making the shuttle's travel as smooth as possible is to use talcum powder. This makes sense to me, it would work like graphite powder (used to lubricate locks & other things that can't get gummed up with oil) but would not stain the cloth.
Today's project is to continue cleaning the shaft rails & heddles. I am using fine steel wool to clean & polish the rails & then putting on a small amount of Tri-Flow, which I then wipe off again. This leaves a very small amount, hopefully enough to prevent further rust. I have not decided how to handle the heddles. I hear that soaking them in vinegar & then washing & drying well will take off rust. The weaver who recommended that to me also suggested using a very light coat of silicone afterward. I've heard enough bad things about it that I'll probably just use the Tri-Flow again if I do that, and use it mainly in the loops where the rails run. For less rust I have just rubbed heddles with steel wool, in the past.
Please feel free to leave comments on your favorite cleaners & lubricants, and ones you don't like too. I moderate comments, so it won't show up immediately.
Also please note that I have turned off the "followers" gadget so that people can follow this blog but maintain their privacy. If you have any other privacy-protecting ideas, let me know.
Thursday, August 5, 2010
Getting Started
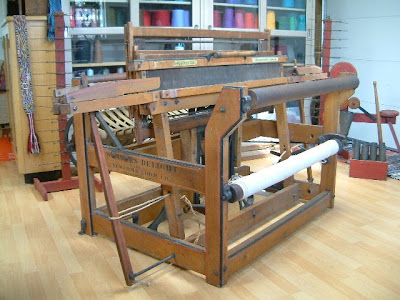
I bought a Newcomb Loom Company Weaver's Delight loom on August 1st, 2010, from the estate of a weaver who died in 2006. Her daughter was also a weaver at one time, so she is really familiar with looms. She and her husband were able to show us how the parts of this thing go together - which is not simple to figure out! Here it is assembled. In the background you can see 2 spool racks and the cylinder filling machine & cylinders that came with it:


Laura

It's a 4-shaft "Automatic" loom. There are no treadles. The shafts are operated by a cam system, and the forward motion of the beater causes the shafts to move into position for the next pick. Pushing the beater back toward the shafts then causes the fly shuttle to be thrown across the shuttle race. So, automatic yes, but automation circa 1890's, when this loom was first patented. Very steampunk!
This loom is number 4703. These were all numbered and they manufactured something around 8000 of them.

Leslie Johnson of Riverside Loomworks, who now sell parts for Newcomb looms (which went out of business in the 80's), tells me this loom shipped from the Newcomb factory on November 26, 1928. It's in remarkable shape for a loom this old. The paint details and even decals are mostly intact:

Here is a view from the side, showing the warp & cloth braking systems (hard to see, I'll go into more detail in a future post):

Here is a back view, showing the approximately one-yard sectional beam:

This blog is a place for me to keep photos, links, helpful advice I've received, and things I've figured out, all in one place.
I hope it's useful to others as well.
Laura
Subscribe to:
Posts (Atom)